Welcome to Country Kids on the Fly - Fly Tying Page. Here you will find fly tying instructions for trout, steelhead, salmon, bass, carp, and other warmwater fly patterns. This page will be updated weekly, so check back regulary for new patterns. If you do not see a fly pattern you would like to tie, and would like me to put the pattern on this page, or if you have any questions about the fly patterns regarding tying, fishing, etc., please email me at countrykidsonthefly@gmail.com.
All the flies featured in this Fly Tying page are avaiable custom tied from Autumn Siren Flies.
The Psycho Prince is an adaption of the old standby the Prince Nymph. Designed by west coast steelhead anglers it was adapted for our Lake Erie steelhead. This color combination is called the Grand River Special. This pattern can be tied in a myriad of colors, black bodies tend to be the most effective.
Hook: MFC 2xl Nymph size 10-16
Thread: Black 6/0
Weight: Gold Beadhead
Tail: Black Goose Biots
Wingcase: Turkey
Body: Black Ice Dub
Rib: Fine Copper Wire
Wing: White Goose Biots
Thorax: Chartreuse Ice Dub
STEP 1: Place a 2xl nymph hook with a gold beadhead into your vise. Attach your thread behind the beadhead, build a thread dam, and wrap back to the tie in point. Tie in a tail of two black goose biots.
STEP 2: At the tie in point tie in a length of fine copper wire and turkey tail.
STEP 3: Dub a body of black Ice Dub leaving a small area about the width of the beadhead behind the beadhead.
STEP 4: Pull the turkey tail over the Ice Dub body to form a wingcase. Secure down with several thread wraps and trim the excess.
STEP 5: Rib the body with fine copper wire.
STEP 6: On each side of the fly tie in a white goose biot.
Top View
STEP 7: Dub a ball of Chartreuse Ice Dubing behind the beadhead. Orange, Steelie Blue, or Pink can be substituted.
STEP 8: White finish and finish off the fly with a drop of head cement.
Hook: Curved Nymph Hook
Thread: Tan 6/0
Weight: Gold Beadhead
Tail: Brown Goose Biots
Body: Large Uni-Wire
Wingcase: Black Thin Skin
Thorax: Peacock Herl
Legs: Brown Goose Biots
STEP 1: With a MFC in your vise, attach your thread behind the beadhead and wrap
back to the tie-in-point. Take 2 brown goose biots and hold them with the convex sides together.
Tie them in as a tail and split the with your thread.
STEP 2: Tie in a length of large Uni-Wire. Advance your thread 2/3 the
way up the hook.
STEP 3: Wrap the wire 2/3 the way up the hook, secure the wire with several pinch
wraps and tie off.
STEP 4: Tie in a piece of 1/4th in wide black MFC Thin Skin for the wingcase and three strands of peacock herl.
STEP 5: Wrap a ball of peacock herl behind the beadhead. Tie off the herl and clip the excess.
STEP 6: Pull the thin skin over the peacock herl thorax. Secure with sevral wraps.
STEP 7: On either side of the fly tie in a brown goose biot for a wing. Whip finish and finish off the fly with a drop of head cement.
The marabou muddler is one of my favorite general purpose fly pattern. Last spring Art and myself did well using the yellow version for smallmouth, carp, and northern pike on the Allegheny Reservoir, trout on the Kinzua Tailwater, and Chadakoin River carp all summer long. Tied with a light cone, the buoyant deer hair gives this fly a slow sink that is perfect for cruising carp. I split this pattern into two steps, the body and the head since you must change from the 6/0 you use for the body to the heavier stuff you use to spin the deer hair.
Hook: MFC no. 7008 size 8 or a Daiichi 2220 size 6-10
Weight: gold colored brass conehead Body
Thread: 6/0
Tail: red schlappen fibers
Body: silver braid
Wing: yellow marabou
Flash: pearl krystal Head
Spun Deer Hair or Cow Elk
The Body
STEP 1: Take a MFC no. 7008 size 8 or a Daiichi 2220, flatten the barb, and slip on a appropriately sized gold colored brass conehead. Attach your 6/0 black thread behind the conehead and wrap back to the tie in point.
Take a large clump of red schlappen feather fibers and tie them in so they extend 1/2 the length of the hook shank past the tie in point.
STEP 2: At the tie in point tie in a length of silver braid. Advance your thread 2/3 the way up the shank.
Wind the silver braid up 2/3 the way up the hook shank. Secure with the thread and trim off the excess.
STEP 3: Take a plum of yellow marabou, remove the center stem, and tie in so the marabou extends the same length as the red schlappen does. Tim off the excess and secure several wraps of thread.
STEP 4: Tie in 3 strands of pearl krystal flash onto either side of the marabou. Trim so they are the same length as the marabou. Whip finish and trim off the 6/0 thread.
Tie up several bodies before tieing the deer hair heads.
The Deer Hair
STEP 5: Take your 3/0, "G", "GX2", or other heavy thread between the marabou and the conehead. Color choice is up to you.
STEP 6: Cut a piece of deer hair from the hide approx. the size of a pencil. Stack the hair in a hair stacker so the tips are all the same length. Spin the deer hair so the tips form a collar around the marabou. Do not the tips or butts of the hair.
STEP 7: Push the deer butts back and build a thread dam in front of the deer hair so the butts stick straight up at 90 degree angles from the shank.
STEP 8: Cut a second clump of deer hair, cut off the tips, and remove the underfur. Take the clump and spin in front of the deer hair collar. Whip finish and tie off.
Tie several deer hair heads before trimming.
STEP 9: Take your hair scissors and trim the deer hair butts so they form a head the same diameter as the cone. DO NOT TRIM THE TIPS!!!
The Hexagaina nymph is present in huge numbers along the shore of Lake Erie and tributaries (if you have ever experienced the spectacular "Michigan Caddis" hatch in June this is the nymph). Steelhead prey heavily on these nymphs both in the lake and in the streams during their spawning run. I find Hexagaina nymphs to be most effective early in the run (late-September to early-October) although steelhead will take it in winter and spring. Since Hexagainas are burrowing nymphs, they are most effective when fished over the muddy/silty bottoms found near the mouths of creeks. This is also a highly effective fly for spring Smallmouth Bass.
Hooks: Daiichi 1260 or MFC 7231 size 8-10
Weight: black beadchain eyes
Thread: tan 6/0
Tail: orange Glo-Bug yarn
Body: gray ostrich herl
Rib: medium copper wire
Back: pearl flashabou
Hackle: tan hen back
Wingcase: turkey
Thorax: gray ostrich herl
STEP 1: Take a MFC no. 7231 size 8-10 in your vise. Attach the 6/0 tan thread behind the eye, tie in a pair of black beadchain eyes useing a figure 8 knot, and wrap back to the tie in point.
STEP 2: Take a strand of orange Glo Bug yarn and tie it in for the tail. Secure down and trim off the excess. The tail should extend approx. 3/4 in past the tie in point.
STEP 3: Clip three long tan or gray ostrich herls and tie them in by their tips at the tie in point. Tie in 3-4 strands of flashabou onto the top of the shank, and a length of copper wire. Advance your thread 2/3rd the way up the shank. Palmer the ostrich herl up to the thread in even tight spaces. Tie down the herls but do not trim them off.
STEP 4: Pull the flashabou over the body and rib with the copper wire. Trim off the excess of both materials, leaving the ostrich herl remnants intact.
Top View
STEP 5: Tie in a tan henback feather and a clump of turkey fibers (15-25) on top of the shank. Advance your thread to behind the beadchain eyes.
STEP 6: Form the abdomen by palmering the ostrich herl in tight even wraps. Palmer the hen back over the herl to give the fly legs. Tie off both materials behind the beadchain eyes.
STEP 7: Move your thread to in front of the eyes. Pull the turkey fibers over the abdomen to form a wingcase. Tie off and trim the excess. Whip finish and add a drop of head cement.
The Blood Dot is arguably the most popular egg pattern for Great Lakes steelhead. Invented by PA steelhead fisherman Jeff Blood, the Blood Dot is a highly realistic imitation of a single steelhead egg. The fly is not named because its characteristic dot is supposed to imitate blood, but because it "Blood's" dot. This is the original Blood Dot pattern just as Jeff ties them. This fly has become so popular that almost every fly pattern tied out of Glo-Bug yarn with a dot is called a blood dot. Most are not blood dots, however they are tied out of heavily compacted yarn tied in a round ball. The tightly packed yarn is not a good imitation of the translucent steelhead egg.
Hook: MFC no. 7045 size 10-18
Thread: UTC 6/0, color to match dot or body color.
Body: Glo-Bug Yarn, tied in sucker spawn style. Usually a egg color.
Dot: Glo-Bug Yarn, usually a bright color
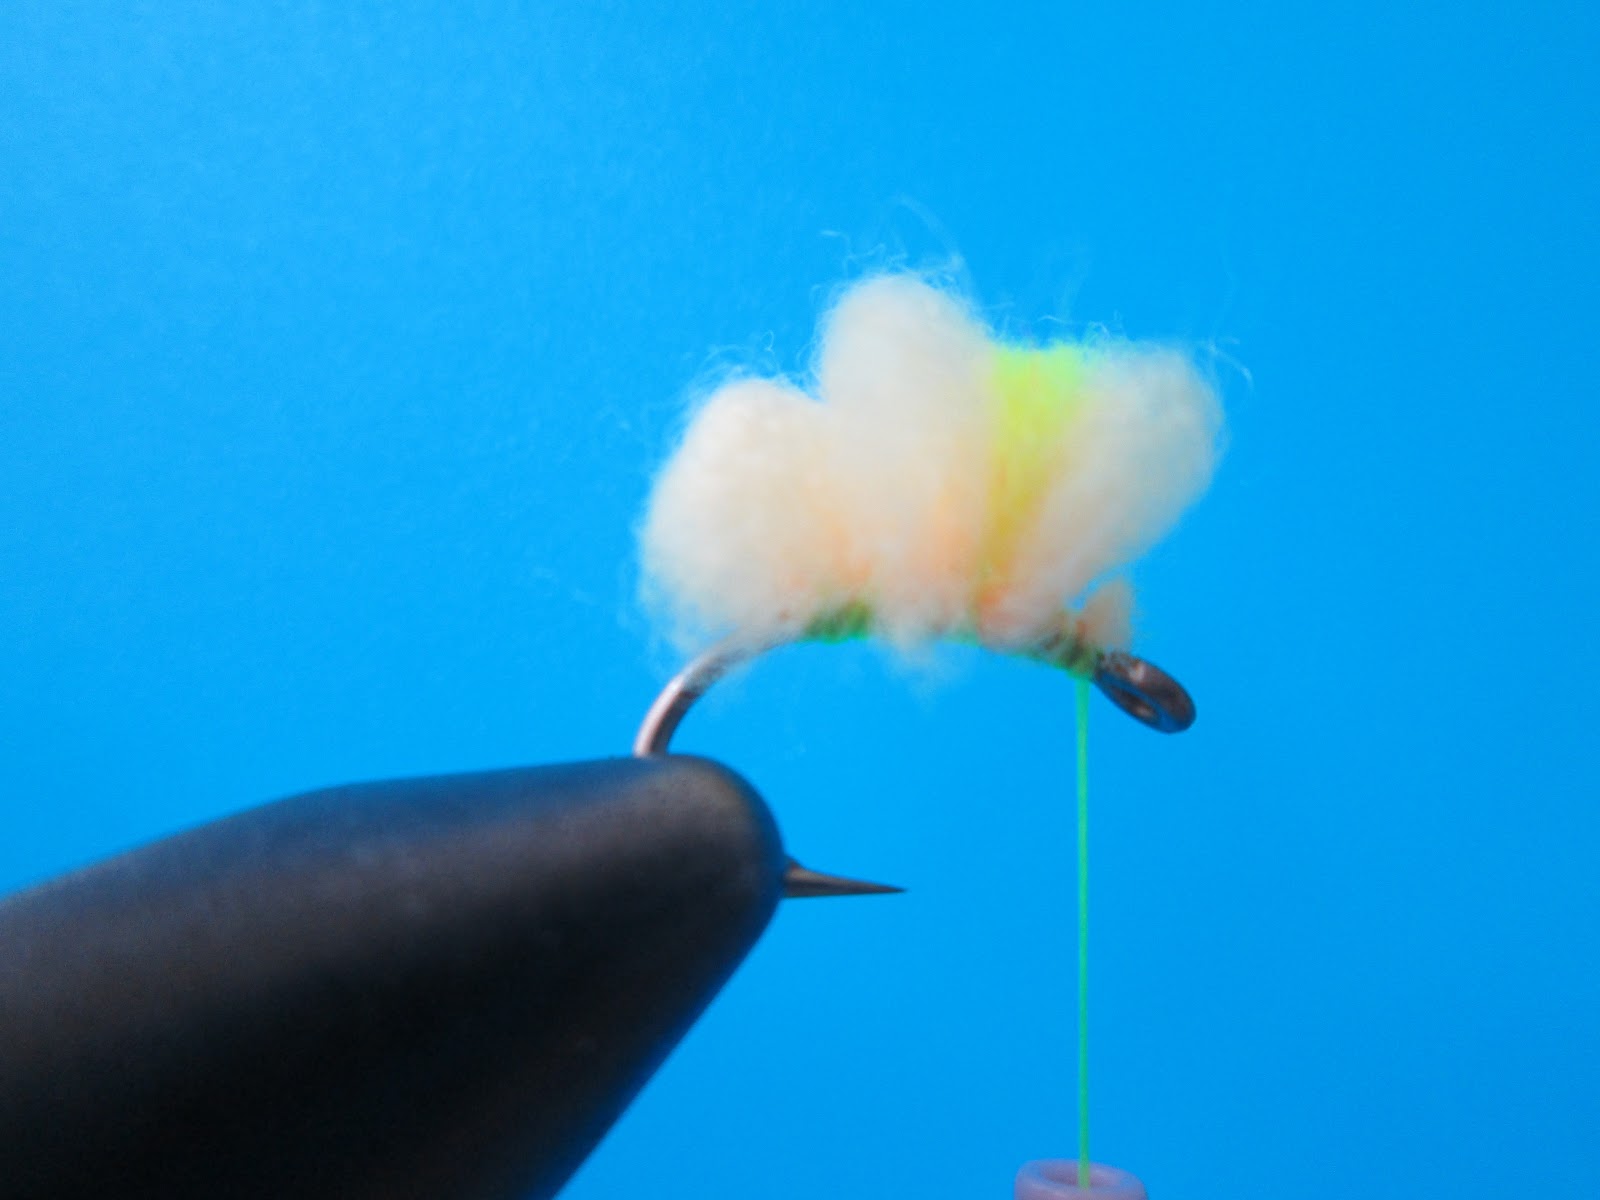
STEP 1: With a Montana Fly Company no. 7045 size 10, 12, 14, or 16 in your vise, attach the thread behind the eye with a jam knot and wrap back to just in front of the barb. Don't go back too far or you will distort the proportions of the entire fly.
STEP 2: Separate a strand of Glo-Bug yarn into strands the diameter of the hook gap. For a size 12 hook, you usually get 4-5 strands from the main piece. Sparseness is the key to this pattern. Less material means more translucency and more fish. Tie the strand of Glo-Bug yarn in at the tie in point, and make enough thread wraps so the hook shank is all the color of the thread.
STEP 3: Advance your thread 3 wraps and form the first egg loop by bringing the yarn forward and tieing down with a pinch wrap. This loop should be small, about half the size of the hook gap.
STEP 4: Advance your thread another 3 wraps, your thread should be 2/3 the way up the shank from the tie in point now. Form a second loop that is slightly larger than the first. Make sure to make this loop messy, push it back over the first loop.
STEP 5: Take another piece of glo bug yarn (a bright color such as orange or chartreuse) and split it into strips that are 1/2 the size of the ones you used earlier. Less is more with this fly, you need to experiment to see how much material you need. Take the yolk/dot material and tie it in in front of the second loop. Pull both ends up and make a couple of more wraps in front of the yarn.
STEP 6: Make the last loop directly in front of the dot. This loop should be the same size to slightly smaller in size than the second loop. Push the loop back over the dot. Cut off the excess material tag.
STEP 7: Pull both the ends of the dot material up at the same time and cut the material off at a angle. Whip finish and cut off the thread.
The Finished Fly
I prefer to tie Blood Dots in sizes 12-16 for low water steelhead. I do sometimes use a size 10 orange/red Blood Dot for dirty water, I prefer to use Estaz Spawn, Crystal Spawn, or Otter's Egg 3x6mm Cluster's steelhead in off-color water. Steelhead egg are usually a tannish color with a orange or pink tint (I call this egg color). The embryo inside the egg is usually orange. The most effective colors for steelhead are egg/orange, egg/pink, egg/chartreuse, egg/cerise, and egg/blue. For water that's a bit off-color (or a green tint) I like to use a blood dot with a pink, orange, chartreuse, or blue body with a red dot. Another option for tieing is to use Glo-Bug Bling yarn which has pieces of flash embedded in it.