Welcome to Country Kids on the Fly - Fly Tying Page. Here you will find fly tying instructions for trout, steelhead, salmon, bass, carp, and other warmwater fly patterns. This page will be updated weekly, so check back regulary for new patterns. If you do not see a fly pattern you would like to tie, and would like me to put the pattern on this page, or if you have any questions about the fly patterns regarding tying, fishing, etc., please email me at countrykidsonthefly@gmail.com.
All the flies featured in this Fly Tying page are avaiable custom tied from Autumn Siren Flies.

Friday, November 16, 2012

Blood Dot


The Blood Dot is arguably the most popular egg pattern for Great Lakes steelhead.  Invented by PA steelhead fisherman Jeff Blood, the Blood Dot is a highly realistic imitation of a single steelhead egg.  The fly is not named because its characteristic dot is supposed to imitate blood, but because it "Blood's" dot.  This is the original Blood Dot pattern just as Jeff ties them.  This fly has become so popular that almost every fly pattern tied out of Glo-Bug yarn with a dot is called a blood dot.  Most are not blood dots, however  they are tied out of heavily compacted yarn tied in a round ball.  The tightly packed yarn is not a good imitation of the translucent steelhead egg.

Hook: MFC no. 7045 size 10-18
Thread: UTC 6/0, color to match dot or body color.
Body: Glo-Bug Yarn, tied in sucker spawn style. Usually a egg color.
Dot: Glo-Bug Yarn, usually a bright color

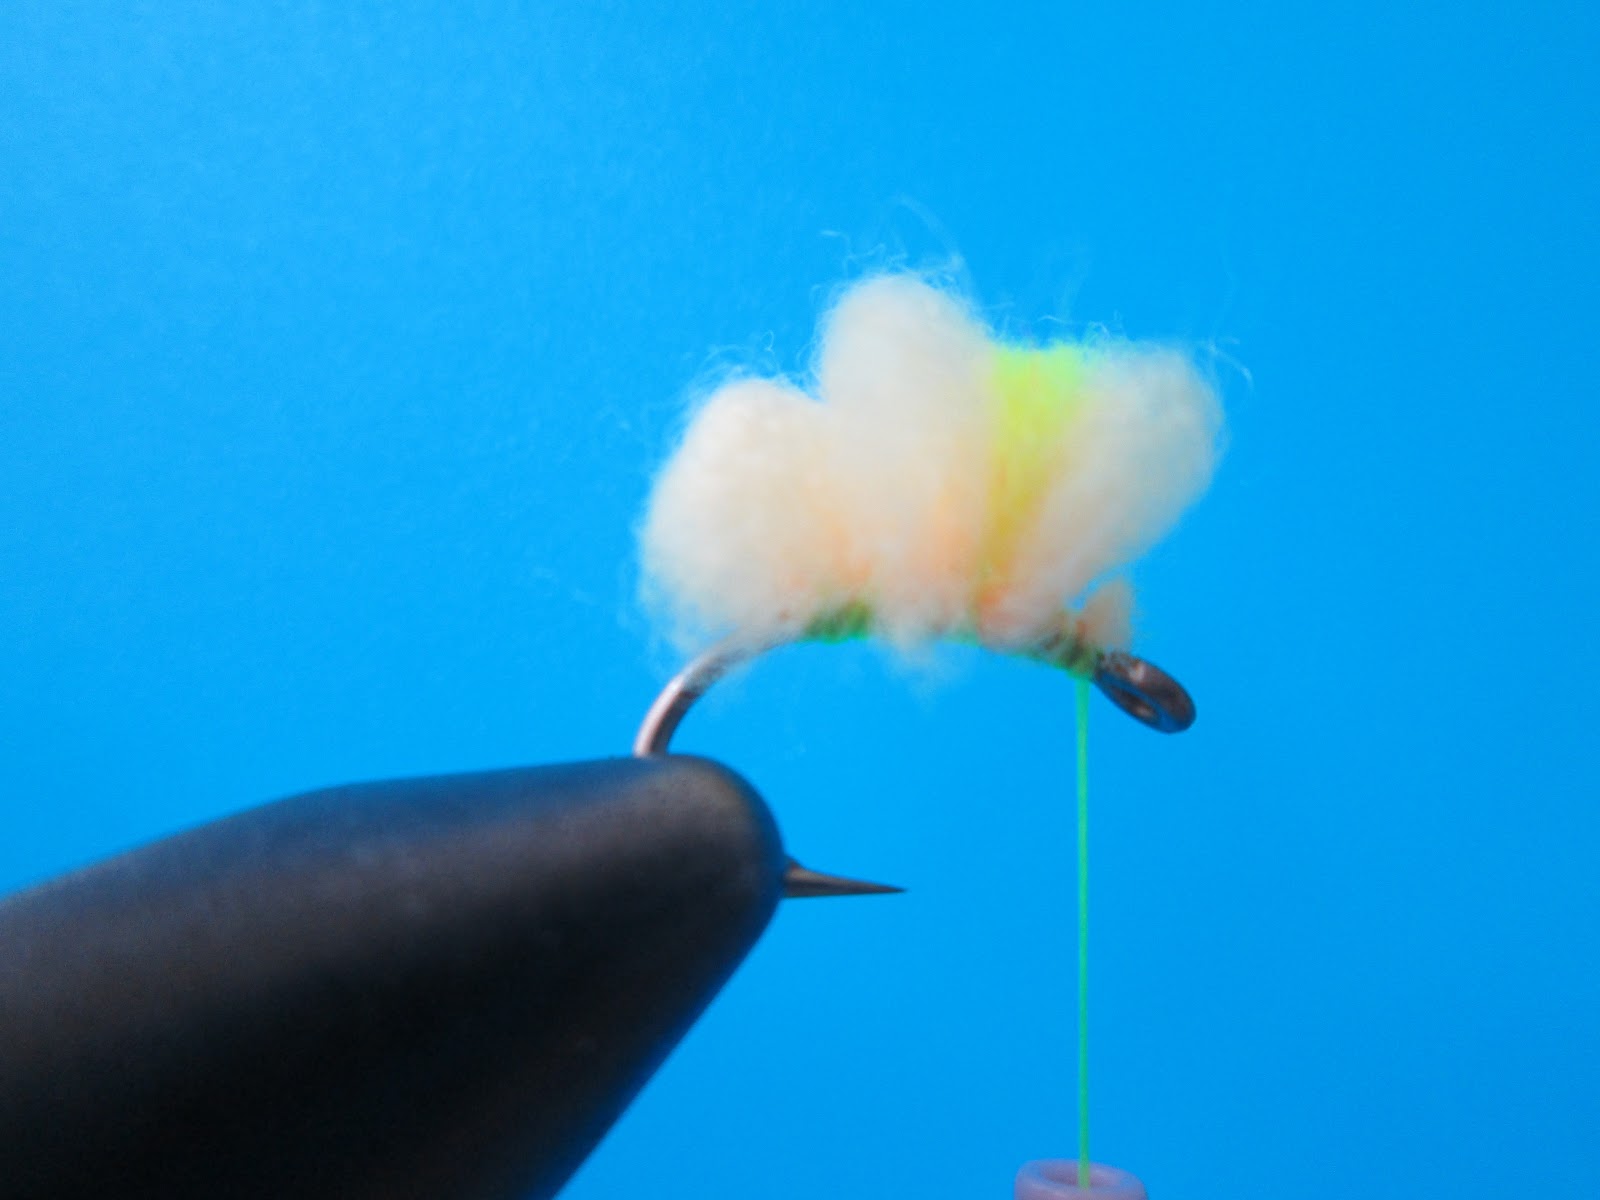
STEP 1: With a Montana Fly Company no. 7045 size 10, 12, 14, or 16 in your vise, attach the thread behind the eye with a jam knot and wrap back to just in front of the barb.  Don't go back too far or you will distort the proportions of the entire fly.


STEP 2:  Separate a strand of Glo-Bug yarn into strands the diameter of the hook gap.  For a size 12 hook, you usually get 4-5 strands from the main piece.  Sparseness is the key to this pattern.  Less material means more translucency and more fish.  Tie the strand of Glo-Bug yarn in at the tie in point, and make enough thread wraps so the hook shank is all the color of the thread. 


STEP 3: Advance your thread 3 wraps and form the first egg loop by bringing the yarn forward and tieing down with a pinch wrap.  This loop should be small, about half the size of the hook gap.


STEP 4: Advance your thread another 3 wraps, your thread should be 2/3 the way up the shank from the tie in point now.  Form a second loop that is slightly larger than the first.  Make sure to make this loop messy, push it back over the first loop.


STEP 5: Take another piece of glo bug yarn (a bright color such as orange or chartreuse) and split it into strips that are 1/2 the size of the ones you used earlier.  Less is more with this fly, you need to experiment  to see how much material you need.  Take the yolk/dot material and tie it in in front of the second loop.  Pull both ends up and make a couple of more wraps in front of the yarn.


STEP 6:  Make the last loop directly in front of the dot.  This loop should be the same size to slightly smaller in size than the second loop.  Push the loop back over the dot.  Cut off the excess material tag.


STEP 7: Pull both the ends of the dot material up at the same time and cut the material off at a angle. Whip finish and cut off the thread.


The Finished Fly


I prefer to tie Blood Dots in sizes 12-16 for low water steelhead.  I do sometimes use a size 10 orange/red Blood Dot for dirty water, I prefer to use Estaz Spawn, Crystal Spawn, or Otter's Egg 3x6mm Cluster's steelhead in off-color water.  Steelhead egg are usually a tannish color with a orange or pink tint (I call this egg color).  The embryo inside the egg is usually orange.  The most effective colors for steelhead are egg/orange, egg/pink, egg/chartreuse, egg/cerise, and egg/blue.  For water that's a bit off-color (or a green tint) I like to use a blood dot with a pink, orange, chartreuse, or blue body with a red dot. Another option for tieing is to use Glo-Bug Bling yarn which has pieces of flash embedded in it. 

Egg/Orange
Egg/Pink

Egg/Chartreuse

Egg/Cerise

Jeff Blood ties the Blood Dot


Monday, November 12, 2012

Ice Dub Bugger


The Ice Dub Bugger is a simple woolly bugger pattern for steelhead.  Slightly different to fool our educated steelhead, fish this fly just as you would a regular woolly bugger. Dead drift or swing.

Hook: MFC no. 7099 size 8-10
Thread: 3/0
Weight: beadhead (optional)
Tail: marabou
Body: Ice Dub
Hackle: schlappen
Colors: black, olive, white, purple

STEP 1: Take a MFC no. 7099 size 8 and place it in your vise.  Take your thread and use a jam knot to attach your thread to the hook shank.  Wrap back to the tie in point.


STEP 2: Select a large marabou plum and remove the stiff center stem. Measure the feather against the hook shank, the marabou should extend past the tie in point the same length as the shank. Tie in the marabou using a pinch wrap and bind down the stem. Trim off the excess.


STEP 3: Select a large schlappen feather, remove the fluffly fibeers from the base of the hackle, and tie the feather in at the tie in point.


STEP 4: With your thread hanging down at the tie in point, dub a 2-3in. long section of Ice Dub onto your thread. 

STEP 5: Dub a evenly tapered body with the Ice Dub up to behind the hook eye. (Photo 5A)


Photo 5A
Take a piece of the velcro and use the rough side to roughen up the Ice Dub body. (Photo 5B)

Photo 5B
STEP 6: Palmer the schlappen feather up the hook eye.  Right before you tie off, wind 3 wraps of hackle directly on top of each other to form a collar.  Whip finish and cut the thread.


The Finished Fly

Sunday, November 11, 2012

Easy Finn Raccoon Leach


Easy Finn Raccoon Leech is a real easy, fast and simple egg sucking leech fly for steelhead, trout, and smallmouth.  This fly is tied with Finn Raccoon hair which has great movement in the water. The key to the effectiveness is sparseness, don't use a lot of material.  The egg on this fly is a 8mm Otter's Milking Egg but you can use a Trout Bead if you wish. Orange is the most effective color but you can experiment with pink or chartreuse. You can tie this fly can be tied in an endless number of color combinations.  Tie some up for your next steelhead trip

Hook: MFC no. 7008 size 8-10
Thread: black or olive 6/0
Tail: Ice Dub
Wing: Finn-Raccoon Hair
Egg: size 8 hook - Otter's Soft Milking Egg 8mm or Trout Bead
         size 10 hook - Otter's Soft Milking Egg 6mm or Trout Bead
Color Combinations: (Ice Dub/Finn Raccoon) Chartreuse/Black, Pink/Black, All Black, blue/olive, olive/black.

STEP 1: Take a Montana Fly Company no. 7008 size 8 streamer hook and place it in your vise.  Take your 6/0 black thread, attach mid-shank and wrap back to the tie in point.  While tieing this fly, try not to get any of the black thread where the egg will go, it will show through the translucent Otter Egg.


STEP 2: Select a clump of Ice Dub and tie in a sparse clump mid shank. Tie the clump in so there is an equal amount of material on either side of the wraps.  


STEP 3:  Wet your fingers and comb the Ice Dub back to the rear of the hook.  Make a couple of wraps over the spot where the dub was tied in to keep the Ice Dub in position.  Advance your thread half way between the dub and the hook eye.


STEP 4:  Tie in a sparse clump of black or olive Finn Raccoon hair. Push the hair around the shank with your fingers so all 360 degrees of the fly are covered.  DO NOT trim the butts, they will be used to form a collar.


STEP 5:  Push the butts of the Finn Raccoon back and secure with several thread wraps to form a collar. Be sure to leave enough room for the egg.  Whip Finish and cut the thread.


STEP 6: Place a drop of Loctite Super Glue Gel on the hook shank.


STEP 7: Push your Otter Egg of choice over the drop of super glue.  Hold the egg in place for several seconds until the glue dries.

The Finished Fly
 

Saturday, November 10, 2012

Elk Creek Bugger


 The Elk Creek Bugger is a version of the white woolly buggers that have become popular on Elk Creek.The Elk Creek Bugger is a mix between the Flash Fly and the white Woolly Bugger.  White was the original but chartreuse, black, olive, and blue are also effective colors while swinging for steelhead.

Hook: MFC no. 7099 size 8
Thread: 3/0 color to match fly
Weight: gold beadhead
Tail: marabou
Body: Estaz or cactus chenille
Wing: 6 strands of pearl flashabou
Collar 1#: 2 wraps of olive schlappen
Collar 2#: olive guinea fowl feather
Colors: white, olive, black, chartreuse, blue

STEP 1: Take a MFC no. 7099 size 8, flatten the barb, and slip on a large gold beadhead.  Attach your thread behind the beadhead, build a thread dam to prevent the bead from slipping backwards, and wrap back to the tie in point.


STEP 2: Select a large marabou plum and remove the stiff center stem.  Measure the feather against the hook shank, the marabou should extend past the tie in point the same length as the shank.  Tie in the marabou using a pinch wrap and bind down the stem.  Trim off the excess. (Photo 2A)


Photo 2A

 
At the tie in point, tie in a length of Estaz or cactus chenille. Advance your thread to behind the beadhead.
Photo 2B
STEP 3: Wrap the Estaz or cactus chenille up to the thread behind the beadhead.  Secure and trim off the excess.


STEP 4: Take 4-6 strands of pearl flashabou and tie in on the top of the fly.


STEP 5: Take a Schlappen feather, strip off the fuzzy fibers on the bottom, and tie in by the tip (Photo 5A).
Photo 5A

Wind two wraps of hackle onto the fly.  Be sure to be sparse with this step.  Trim off the excess hackle. (Photo 5B)

Photo 5B

STEP 6: Take a large Guinea Fowl feather that's dyed to match the color of the flies body (available from Spirit River).  Use a natural colored feather (black and white) for a white bodied bugger.  Prepare the feather by stripping off the fuzzy material at the base of the stem and pulling the fibers back.  Tie the feather in by the tip. (Photo 6A)

Photo 6A

Wrap the guinea fowl feather around the shank twice, then secure and trim off.  Whip finish and add a drop of head cement. 


The Finished Fly

Wednesday, November 7, 2012

Pink Lady Sucker Spawn


 Requested Fly Tutorial 

The Pink Lady Sucker Spawn is just like any other sucker spawn tied with glo bug yarn but this color combination of pink lady and chartreuse has proven extremely effective for steelhead.  This pattern imitates a small cluster of eggs drifting in the current.  This fly does not however imitate sucker eggs (suckers spawn in May) but most likely steelhead or trout eggs.  Because of this flies subdued colors, I like this fly for low water steelhead.  This fly is most effective fished dead drifted in a tandem rig behind a heavier beadhead nymph.

Hook: MFC no. 7045 size12-16
Thread: chartreuse 6/0
Tail: 4 strands of pearl krystal flash
Body: 2 strands of pink lady Glo-Bug Yarn


Pink Lady Glo Bug Yarn is a good color to imitate eggs.  It is a light pink with a chartreuse tint.  Try to use the strands with the more pink color.  You should tie this fly with two strands of yarn when compared to a penny about the diameter of Lincoln's head.  Tie both strands in at once and give each a slight twist (1/2 turn) before forming the loop.  Remember sparse is better.

STEP 1: With your scud hook in your vise, take attach your thread and wrap back to the tie in point.


STEP 2: Take 4 strands of pearl krystal flash and tie them in for the tail.  Trim them so they extend past the tie in point the same length as the hook shank.


STEP 3: Take the two strands of yarn you prepared earlier and tie them in a the tie in point.  Trim off any excess and tie down the butt end with many thread wraps so all you see is chartreuse.


STEP 4: Advance your thread about a 1/8th in.  Take the yarn strands in one hand and bring them forward to the hook eye giving each strand a slight twist.  Form a small loop with the yarn and secure with your thread.


STEP 5: Advance your thread again so it is about 2/3rd the way up the shank.  Take the glo bug yarn again and form a second loop.  Tie down. 


STEP 6: Form a third loop in the yarn to make the last egg.  Secure with thread, build a head and whip finish.  This is a simple fly that should take less than 2 minutes.


The finished fly.


A wet sucker spawn.

Tyler Straight
Custom Tied Steelhead Flies
CKOF Website Design


Thursday, November 1, 2012

Egg Sucking Leech


The Egg Sucking Leech is a woolly bugger type pattern that is a old standby for fall run steelhead and salmon.  The Egg Sucking Leech is supposed to imitate a leech eating an egg. The  purple/orange combination works particularly well in dirty water. Purple is the last color to be filtered out of water so it is the easiest for the fish to see when visibility is poor (the fish see the outline of the fly). 

Hook: MFC no. 9007 size 6-10
Thread: black 3/0
Weight: leadwire (optional)
Tail: marabou
Body: chenille
Hackle: schlappen
Egg: orange chenille
Colors: black, purple

STEP 1: With your streamer hook of choice in the vise attach your thread mid shank and wrap back to the tie in point.  You may want to add a few wraps of leadwire for weight.


STEP 2: Take a plum of marabou, and remove the stiff tip of the feather.  Measure the marabou against the hook shank, the tail should be the same length as the hook shank.  Tie in the marabou feather at the tie in point.


STEP 3: With your tail tied in, take a length of chenille and a schlappen feather.  Tie the schlappen feather in at the tie in point by the tip.  Strip approx. 1/4 of a inch of the fuzzy part of the chenille off to expose the thread core inside.  Tie in the chenille.  Advance your thread to 1/3in behind the hook eye, leaving enough room for the egg.


STEP 4: Wrap the chenille up to the thread with even wraps.  Tie off with several wraps.


STEP 5:  Wind the schlappen hackle over the chenille to the thread.  The hackle should be evenly spaced up to the thread, then you should make 3 wraps on top of each other.  Tie off and trim of the excess hackle stem.


STEP 6: Now its time to make the egg.  Take a length of orange chenille and prepare it the same way you did for the body.  Tie in the chenille directly in front of were the black body ends.  Advance your thread to behind the hook eye.


STEP 7:  Make a ball of chenille to form the egg. 


The Finished Fly
All the flies shown in CKOF Fly Tying are avaiable from Autumn Siren Flies.